How to Treat Your Patellar Tendonitis Successfully

How to Treat Your Patellar Tendonitis Successfully
Everything I know I either learned by reading academic research, through self-experimentation, or by studying the material of movement experts like Dr. Kelly Starrett, Dr. Perry Nickelston, or Dr. Gray Cook (among many others).I’ve refined the patellar tendonitis treatment I ultimately used to heal my knees down to the following 4 steps. Each step is critical and if you skip one, you’ll be back to where you started.Again:Skip any of these steps and you will NOT recover from patellar tendonitis. I’m handing you a detailed map that will guide you through a minefield. There’s no second-guessing involved. It’s not going to be fun all the time either.Here’s the first step.
Step #1: Stop All Overuse
Here’s an email I get every other day:“Hey Martin, I was wondering if I could continue [INSERT ACTIVITY THAT CAUSED PAIN TO BEGIN WITH] while I rehab patellar tendonitis. Is that okay?”And I get it, I’m an athlete too! I get depressed if I don’t train, so I can definitely relate.But I’m here to help you get better, not make you worse. I’m not going to prescribe anti-inflammatories or sell you a patellar tendon strap and tell you to keep training. That would be grossly negligent.Here’s the truth: you cannot rehab patellar tendonitis while you continue your regular training. If you try, you will fail.Academic research confirms that continuing your regular training stops healing and that athletes should be removed from sports activity during rehab. (Visnes et al. 2005; Visnes, Bahr 2007)Specifically, you need to avoid all running, jumping, heavy squatting, lunging, and heavy hiking during your rehab, unless it’s part of your rehab protocol. If possible, avoid all activities that cause pain. Focus on training your upper body during the treatment.This will help you avoid further damage and it’s necessary for step #2 to work. Here’s why.
Step #2: Use Your Pain to Create Your Rehab Program
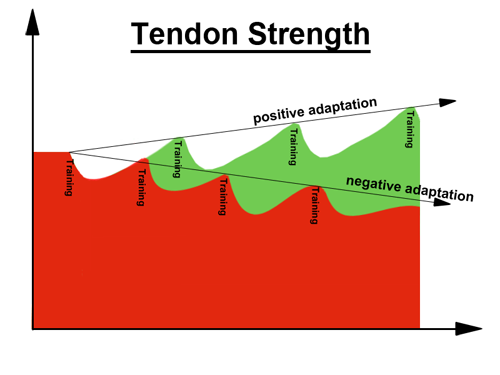
Before we get to the treatment exercises you will be using, let’s talk about the methodology. The exercises are just minutia compared to how important understanding the methodology is.To rehab patellar tendonitis, you have to do just the right exercises at just the right time intervals. The goal is for you to achieve a positive adaptation that strengthens your tendon like so:For your patellar tendon to get stronger you have to do just the right amount of training at the right time.You will use your pain to discover how often you should train, as well as what type of exercises you should be doing. Once you’ve found the right combination, pain will decrease from week to week.Pain may stay a bit higher than normal right after your training, but it should drop down to baseline within 24 hours. If pain stays elevated longer than that, you’ve trained too hard.If pain doesn’t decrease from week to week, you need to experiment by changing one of the following variables during one training month:
Exam
- Removing rest days
- Adding more rest days
- Using less intense exercises
- Using more intense exercises
Again, don’t change all variables at once. You’re like Sherlock Holmes, revealing new evidence to discover how you can crack the case. You need to be systematic and cold-blooded for this to work.Now you can understand why continuing your regular training will totally screw this process up. Any type of unneeded training will make it harder for you to find the rehab program that works because you won’t be sure if pain is the result of the rehab exercises or your regular training.Once you found a combination of treatment exercises and rest days that help you reduce your pain, stick with it until it stops decreasing your pain. Then slowly increase the intensity of your exercises by using more resistance without causing a return of pain (hint: go much slower than you think you can).
Step #3: Pass the Secret Test
This is where most people flush all their rehab progress down the toilet: the secret test! It’s like a rite of passage designed by the tendonitis gods and most folks fail this test, unfortunately.Do you remember treatment fallacy #3? Being pain-free doesn’t mean your patellar tendon is healthy or strong enough for your sport! You MUST NOT trust your pain (or lack thereof). Knowing this is your cheat-code to beat the odds.During your rehab, you will encounter a point at which your pain is almost completely gone. You’ll feel better than you have in a long time and you will have an itch to return to your favorite activity. If you scratch that itch, you’ll be back to square 1 with your treatment. Here’s why.Your patellar tendon has gotten stronger as you progressed through your treatment. It’s strong enough for everyday activities and so pain is no longer an issue.HOWEVER, the tendon is not nearly strong enough for your return to sports yet and if you tried, you’d immediately have a major setback, wasting many weeks of progress.This is the secret test and to pass it, you need to continue your safe rehab program for at least another 2 months AFTER pain is completely gone before you even attempt a return to your sport. Let’s repeat the important point:Even after your pain is gone, you need to continue the safe strengthening regimen you discovered in step 2 for at least another 2 months before you attempt any high impact activities.
Step #4: Be Wise Beyond Your Years
Remember back when your parents told you not to do stuff and you did it anyway? Like we tell kids not to touch the hot stove because it’s … well … hot, but they still have to try it, thinking that maybe the laws of the universe didn’t apply to them.Treating patellar tendonitis is very similar. You’ll be tempted to do things you know you shouldn’t do. For me, this usually was a round of pickup basketball when I knew I wasn’t ready. For you, it’s probably something completely different.Don’t let your guard down. Increase your activity level gradually, always respecting your patellar tendon’s need for at least 2 or 3 days of rest between intense activities. Remember, the pain is still lurking in the shadows, just waiting for you to make one small mistake.It’s cold-blooded and calculating, but life is just more fun without pain.
Your Rehab: Use These Patellar Tendonitis Exercises and Stretches
To get rid of your patellar tendonitis, you have to do two types of exercises. Skip them and you’ll eventually have a setback. Here’s the first group.
Your Rehab: Use These Patellar Tendonitis Exercises and Stretches
To get rid of your patellar tendonitis, you have to do two types of exercises. Skip them and you’ll eventually have a setback. Here’s the first group.
Exercises to Fix Hidden Causes of Tendon Overload
The patellar tendon is overused through a combination of training too much and hidden biomechanical problems that place excessive stress on the tendon.As an analogy, think about how wearing tight and wet jeans restrict your movement. You have to exert more energy and moving around is a little tougher on your joints. The same happens to your patellar tendon, as hidden biomechanical problems place more tension on the tendon.Here’s a list of the most common causes for jumper’s knee:
- Low ankle mobility
- Tight calves
- Tight quadriceps muscles
- Tight hamstrings
- Weak gluteal muscles
- Low hip mobility
- Soft-tissue problems (muscle knots, trigger points, etc.)
I explain each of these in detail in my book Beating Patellar Tendonitis. We’ll only address the most serious problems in this article.Again, these issues overload your patellar tendon over time. This happens slowly, over many weeks. To prevent patellar tendonitis from coming back, you need to fix them! Here are exercises you can use to do that.
#1: Self-Massage Exercises for Instant Pain Reduction
The best way to reduce pain from an overused patellar tendon is to release as much tension as possible from your leg muscles. Stretching may be the first thing on your mind in that regard, but for maximum effect, you need to combine stretching with self-massage.

Self-massage reduces tension in your legs by releasing soft-tissue restrictions in your muscles and it can be very uncomfortable. These restrictions happen when tissues that should glide freely on top of each other are stuck together (after an injury or because of too much sitting and general lack of movement).Self-massage of the quads led to an immediate pain reduction for many of my readers. It’s like when your stomach hurts after eating too much and the first thing you do is undo your belt buckle. It feels soooooo much better!To do self-massage, you will need a foam roller or another round object (e.g., a PVC pipe or a tennis ball). Place the roller under your legs and then roll each leg muscle and the muscles on the side of your hip.

Once you’re done with the self-massage, you can move on to stretching.
#2: Patellar Tendonitis Stretches (for healthy quads, calves, and hamstrings)
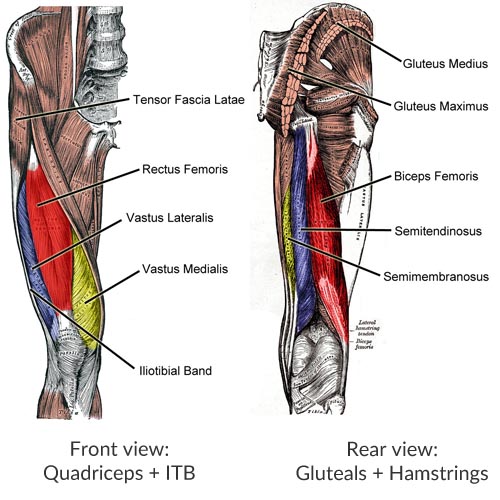
People with jumper’s knee tend to have tightness in the calves, the hamstrings, and the quadriceps muscles. They all cross the knee, so any excess tightness places more tension on the patellar tendon.
If you’re running and jumping with tight leg muscles, your legs are working against additional resistance and pain eventually develops. It’s like driving with your handbrake on: instead of breaking records, you’ll break your body.Before you do any stretches, you must remove all soft-tissue problems in the respective muscle. A muscle with knots and trigger points doesn’t like being stretched and often reacts by becoming even tighter, which we definitely don’t want.Calf Stretches
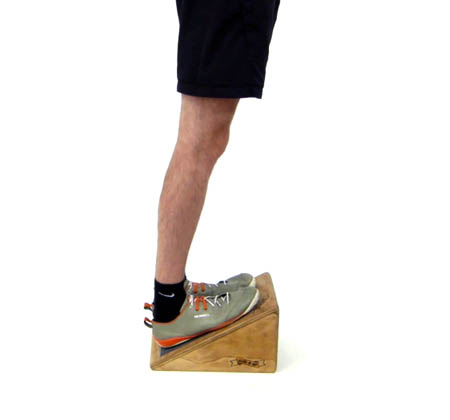
Years ago, I discovered that stretching my calves before basketball games helped me reduce pain. Today, I recommend calf stretches to everyone I work with because of how common tight calves are. The most convenient way to stretch your calves is by using a slanted board:
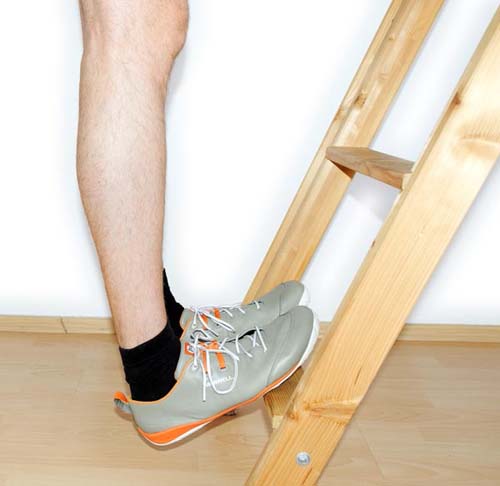
You can achieve a similar effect by placing the balls of your feet on a step and letting your heels drop down like so (You need to wear shoes with a solid but flexible sole for this stretch):
You can also do this stretch by placing the balls of your feet on the curb of the street and letting your heels sink down. That’s what I used to do before basketball games.Hamstring StretchesTight hamstrings are very common today, but you have to be careful with stretching them. Make sure you’ve trained your gluteal muscles because weak gluteal muscles will cause your hamstrings to become overworked, which leads to tightness. We’ll do that with the exercises further down.For now, here’s how you can stretch your hamstrings:
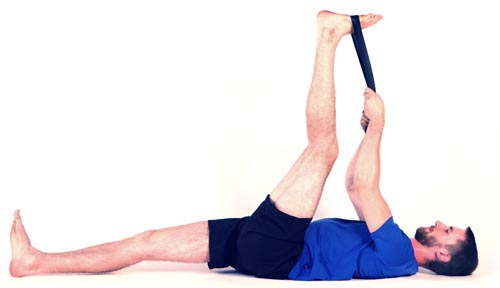
Lie on your back and use a strap to pull one foot closer to your body. Push against it with your foot for 10 seconds while you pull with your hands. Then release the tension by breathing out with an audible sigh. As you relax, pull your foot a little closer. Repeat for about 2 minutes per side.
Quad Stretches
If these particular patellar tendonitis stretches aggravate your pain, don’t do them. Find an alternative version or stick with the self-massage.You will need a padded surface for the first quad stretch and I don’t recommend doing without padding, as it’s painful and may injure your knee.Kneel down in a lunge position and grab the ankle of the rear leg. Next, pull it to your hip. If you notice discomfort in your knee, try moving your knee a bit. I usually lean forward after I grabbed my ankle and then sit up again.
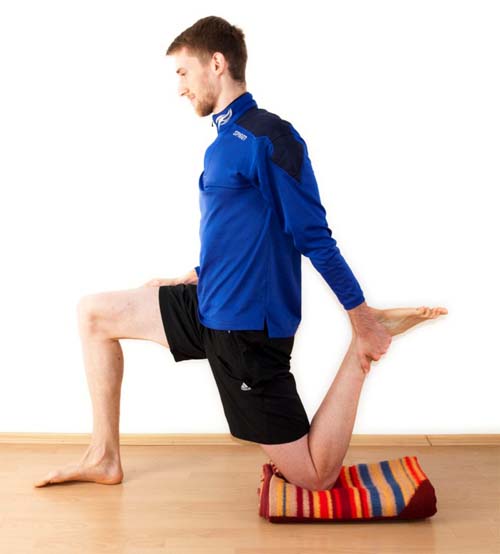
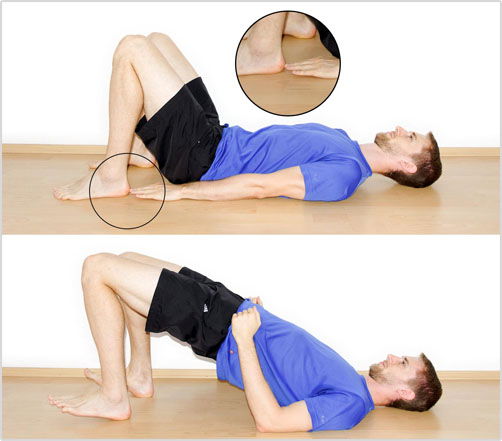
Push your hip forward and sink deeper into the stretch. You can make the stretch more intense by pulling your ankle closer to your hips.Another variation of this stretch is the couch stretch.
Dr. Kelly Starrett of San Francisco Crossfit popularized this variation. Here’s what the couch stretch looks like:
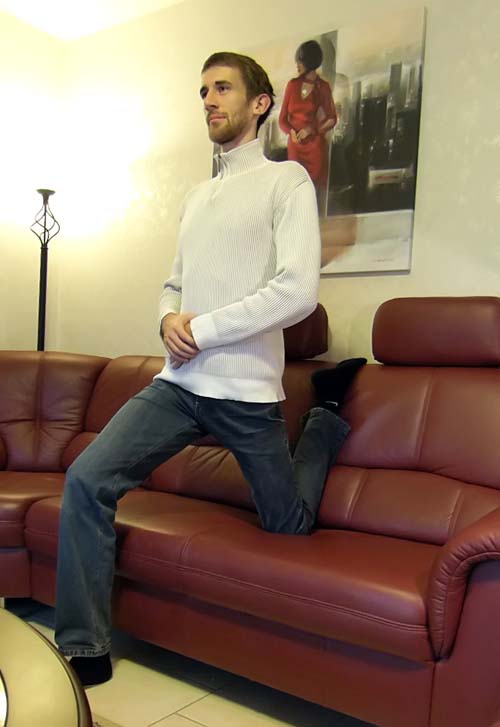
Put your knee into the back corner of the couch and then sit up straight. Don’t round your lower back. Keep your abdominal muscles braced as if you’re bracing for a punch and keep the gluteal muscles of the leg you’re stretching tight.
#3: Hip exercises for better leg alignment
Here’s an analogy to illustrate why good leg alignment is important for a healthy patellar tendon: lifting things off the floor. If you lift with good back alignment, it’s much easier on your spine than if you were to lift with a rounded back, much like running and jumping is easier on your patellar tendon if you move with good leg alignment.
Your feet need to point forward and your knees should track over your toes when you move.
When I go shopping, I usually see many people with knees that cave in towards the midline of their body. Don’t let this happen, it puts excessive strain on the tendon. Also, don’t let your knees come forward when you jump or squat. The shin should stay as close to vertical as possible.The following hip exercises will help you maintain good leg alignment and thereby help take stress off your patellar tendon. Do 3 sets of 10 to 15 repetitions of each exercise:
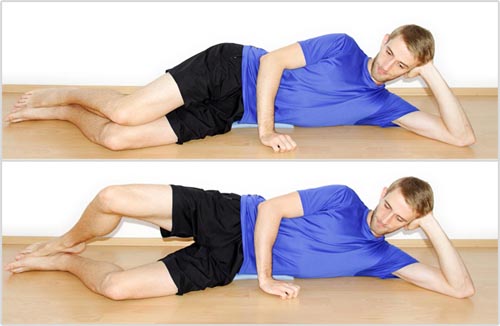
Hip Abductions
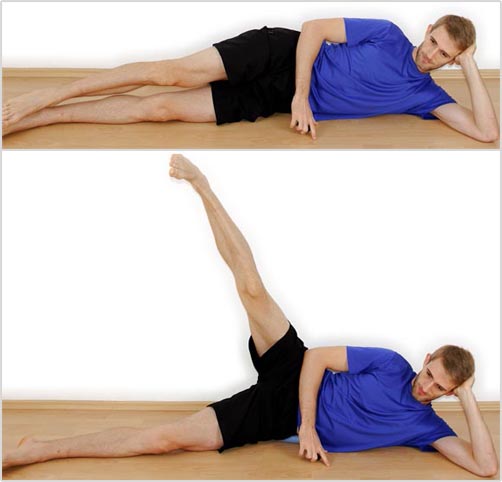
Lie down on your side with your body in a straight line. Lift the upper leg by leading with the heel. Keep your hip in a right angle to the ground and never move it. You should feel the exertion on the outside of your hip (not your thigh). Here’s what it looks like:
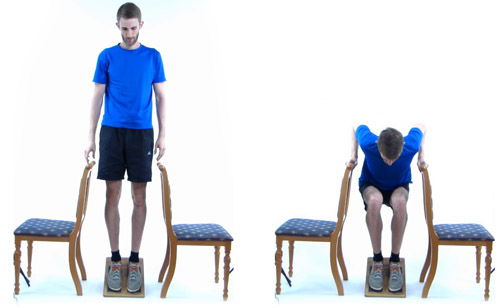
Clamshells
Lie on your side with your legs slightly bent and in front of you. Rotate the upper leg out, just using your hip muscles. Don’t move your hip and don’t push off with your feet.
Glute Bridges
Lie down on your back. Next, slide your heels in so that your middle fingers gently touch your heels. Now, push through your heels to form a straight line from your knees to your shoulders. Poke your buttocks muscles and your hamstrings to make sure your buttocks muscles are tighter.Finally, here’s how you can stimulate healing in your tendon.
Get Rid of the Pain with This Exercise
All of the previous exercises on this page will help you take tension off the patellar tendon. Reducing tension is crucial to allow healing. Like you have to jack up a car before you can change a flat tire.This is the BARE MINIMUM of what you need to do to treat your patellar tendonitis.
Let’s get back to stimulating healing…In chronic patellar tendonitis (“patellar tendinosis,” as some call it), your body has given up on healing the patellar tendon because you’ve interrupted these healing attempts too frequently.The fibers in the weakened tendon are a chaotic mess and if all you do is rest, this won’t change. Instead, you need to place controlled tension on the tendon to restart the healing mechanism and then let your body finish its work, before you place higher tension on it again.Academic research has revealed one exercise to be particularly good at stimulating healing in a damaged patellar tendon: eccentric squats on a slanted board.
How to Do Eccentric Squats for Patellar Tendonitis
This is actually a common physical therapy exercise. Here’s a video demonstrating the technique.I explain the technique in detail in this article: eccentric slant board squats for patellar tendonitis (or watch the above video). Here are two pictures to give you an idea:
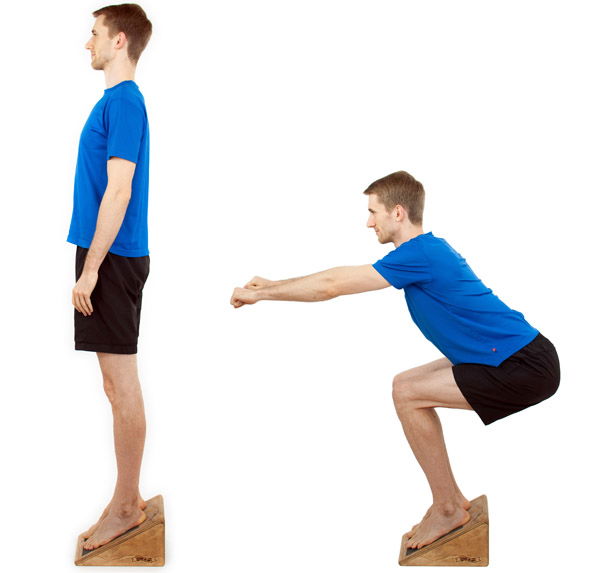
Patellar tendonitis in one knee: place more weight on the injured leg on the way down.
Patellar tendonitis in both knees: support your weight on the way up.
If you don’t have access to a slanted board, you can improvise something similar or build one yourself, if you have tools. Alternatively, do the exercise on flat ground. It’s not as efficient, but it works as well.
Best Of Luck!