Triceps
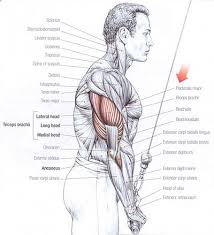
The triceps brachii is a major muscle of the upper arm in the human body. The triceps run along the humerus (the main bone of the upper arm) between the shoulder and the elbow. Along with the biceps, it enables extension and retraction of the forearm. When the triceps are contracted, the forearm extends and the elbow straightens; if the triceps are relaxed and the biceps flexed, the forearm retracts and the elbow bends. The triceps also serve to stabilize the shoulder joint at the top of the humerus. The shoulder has the greatest range of motion of any joint in the body, possessing the ability to turn and rotate in many directions. However, this movability means that the shoulder is a relatively unstable joint, and the triceps plays an important role in stabilizing it. The distal portions of the triceps are also involved in retracting the capsule of the elbow joint when the forearm extends, thereby allowing the elbow joint to be straightened successfully. The muscle is supplied with oxygen and nutrients by branches of the deep brachial artery. It is also innervated by four branches of the radial nerve. Both the artery and the nerve continue into the lower forearm beyond the triceps.
Training the triceps builds a stronger bench, improves overhead strength, and adds size to your arm. For this reason, we felt compelled to offer our insight on the best triceps training exercises for muscle, strength, and sports performance.
In this Best Triceps Exercises Guide, we will discuss:
- What are the triceps muscles?
- Why is triceps training important and who can benefit?
- 9 Best Triceps Exercises Guides
Triceps Muscles
Triceps in Latin means, “the three-headed muscle of the arm”. As you can see below, the triceps brachii has three different muscle heads all responsible for extension of the elbow joint.
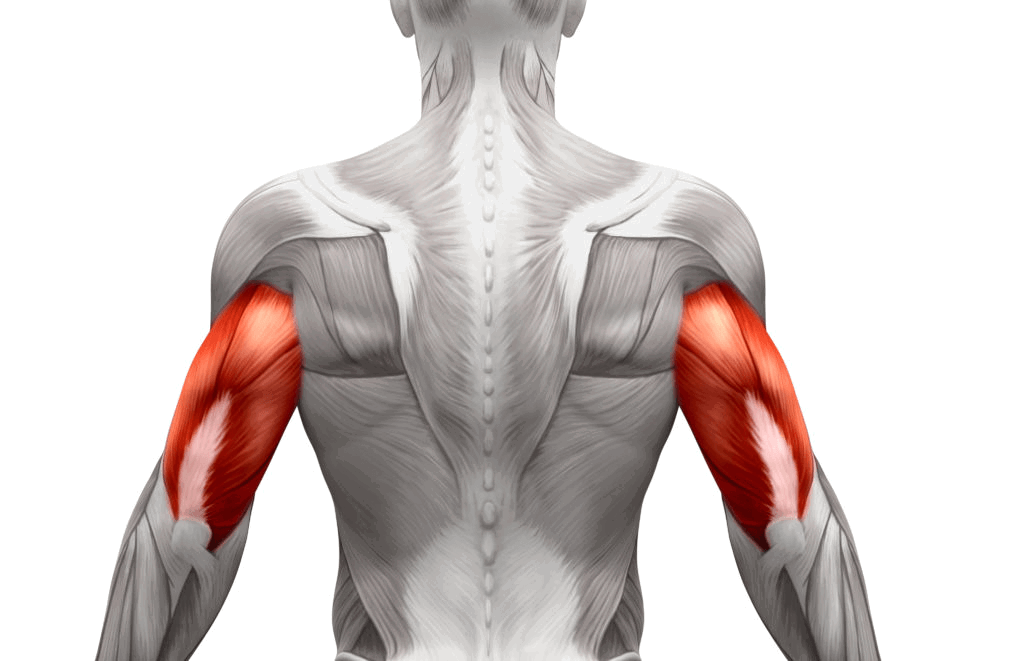
Lateral Head
The lateral head of the triceps brachii is best targeted with the arms at the sides and using an overhand grip. Movements like straight bar pushdowns, bench dips, and close grip/floor/board presses work well to target the lateral head of the triceps brachii.
Long Head
The long head of the triceps brachii is best targeted with the arms overhead. Movements like overhead extensions and skullcrushers work well to target the long head of the triceps brachii.
Medial Head
The medial head of the triceps is best targeted with the arms at the sides and using an underhand grip. Movements like underhand reverse grip pushdowns and triceps kickbacks work well to target the medial head of the triceps
Why Train the Triceps
Below are a few reasons to train the triceps, specifically for certain types of athletes and populations.

Strength Athletes
The triceps are a key assistance exercise for large pressing movements like the bench press, overhead press, jerk, snatch, and more.
Powerliters, weightlifters, and strongman athletes can increase triceps strength and mass to not only aid in pressing performance and overhead stability, but also use them to increase elbow joint health and protect the tendons and ligaments against excessive stress on the elbows.
General Lifters
Aside from the improvements in pressing strength and overhead/ performance; stronger, more muscular triceps are a common goal among lifters. Including triceps exercises within training programs can help boost chest and shoulder development.
Everyday Population
Stronger triceps can aid in pressing and overhead movements for most individuals. For some, stronger triceps will also help to maintain elbows function and help to resist joint pain and pressure due to lack of proper muscular strength and development.
Aging Individuals and/or Desk Bound Folks
Stronger triceps can help aging and deskbound folks in that they assist the pressing muscles of the upper body. Improving triceps performance can help older individuals push themselves up out of low seats, help to absorb shock during stumbles and falls (catch oneself on hands), and ultimately improve the function of the upper body due to improvements in upper body strength and muscle mass.
9 Best Triceps Exercises
Below are 9 (nine) of the best triceps exercises for overall development, strength, and aesthetics. This comprehensive list of triceps exercises includes movements for powerlifters, weightlifters, bodybuilders, and everyday lifters alike.
Please note that there are a wide amount of triceps exercises seen in gyms today, however the below nine have repeatedly proved themselves as some of the most effective strength and muscle building triceps exercise out there.
Before you try other exercises, it is strongly urged that you master the below nine movements.
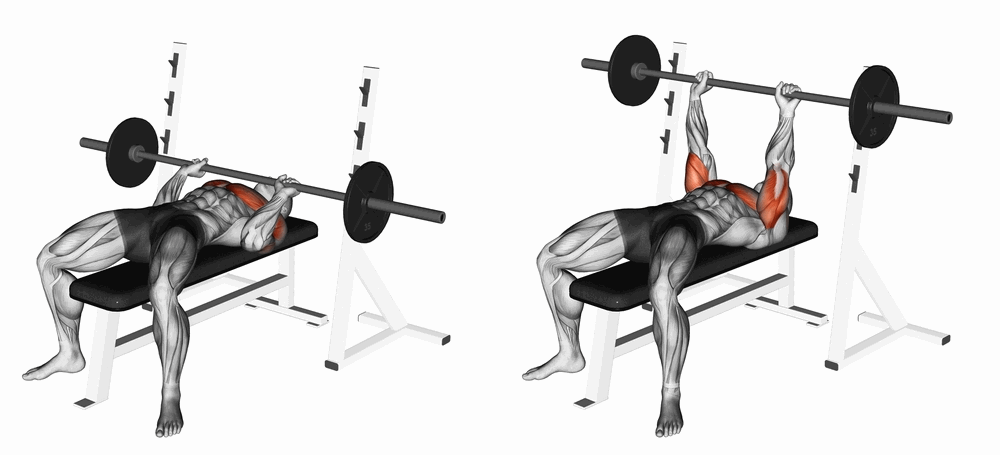
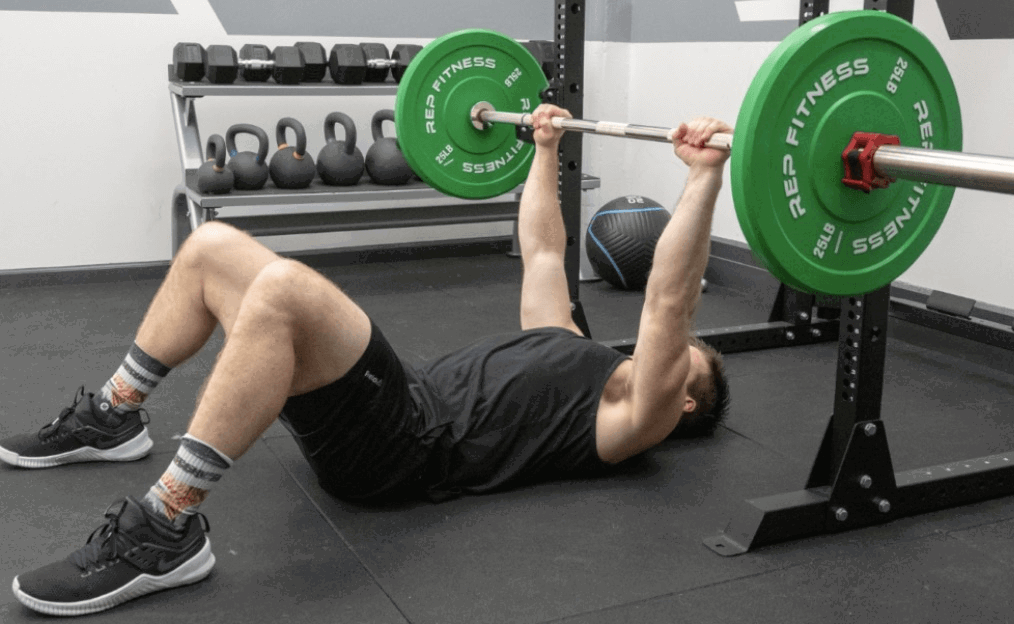
1. Close Grip Barbell Bench Press
The close grip barbell bench press (barbell) is a great exercise to develop the triceps and aid in bench pressing performance. This exercise can be done with light and/or heavy loads and requires little set up.
3 Benefits of the Close Grip Barbell Bench Press
Below are three benefits of the close grip barbell bench press that coaches and athletes can expect to gain when adding this barbell training classic to training programs.
1. Improved Bench Press Lockout Strength
The close grip bench press can help to improve overall size and strength of the triceps, making it a powerful exercise to improve lockout performance for exercises like the bench press and overhead movements.
2. Builds Massive Triceps
The close grip bench press targets the triceps in a way that allows the lifter to use high amounts of external load and volume; a recipe for stimulating high degrees of muscle growth.
3. Less Shoulder Strain than Bench
The close grip bench press can be done to increase pressing strength and performance of lifters who may find that the standard bench press is uncomfortable on the shoulder. This narrower grip pressing movement forces the triceps to bare more of the load, keeping the shoulder joint in a less horizontally extended position.
How to Perform the Close Grip Barbell Bench Press
Below is a brief guide on how to perform the close grip barbell bench press.
- Step 1: Set yourself up similar to a flat bench press, with the grip width slightly narrower. That grip should be set inside shoulder-width, so that the elbows are tucked into the body.
- Step 2: With the back set and knuckles upwards, punch the bar out of the safety rack and stabilize the load over the chest.
- Step 3: Pull the elbow inwards as the bar descends to the chest. Once you have touched the chest, press through the palms feeling the back of the arms/triceps providing the necessary strength to lift the load.
- Take a look at our Bench Press Exercise Guide to learn more about bench press technique, programming for strength and mass, and more!
2. Parallel Dips
The parallel dip is a dip variation that is done using parallel bars. Using the parallel bars, lifters may find they can add more load and produce less stress on the shoulders than the rings and/or bench dips.
3 Benefits of the Parallel Dip
Below are three benefits of the parallel bar dip that coaches and athletes can expect to gain when adding this bodyweight strength exercises into training programs.
1. Stable Dip Variations
While the ring and bench dip variations are effective triceps exercises, the parallel bars offers many lifters the most stability and comfort on the wrists and shoulder joints. Rings dips can be great for increasing shoulder stability, however the instability of the rings makes it troublesome to add higher amounts of external load.
2. Improved Pressing Performance
Similar to the close grip bench press, the dip allows you to add high amounts of loading to the triceps and chest. Due to both the movement at the shoulder and elbow joints, you can use the dip to also increase overall pressing strength and mass of the upper body.
3. Only Requires Bodyweight
The dip, while it can be done with external loading (plates, dumbbells, vests, chains, etc), does not require a lifer to use external loading. This bodyweight exercise can be done with tempos, pauses, and for higher volumes if necessary to increase loading demands and muscular damage.
How to Perform the Parallel Dips
Below is a brief guide on how to perform the bodyweight dip.
- Step 1: Grab the parallel bars with your torso upright (with a slight lean forward) as you are suspended. Have your elbows almost (but not fully) extended to support this position
- Step 2: With the chest up and shoulder blades retracted down the back, bend at the elbows as you lower yourself downwards until the elbows reach 90 degrees.
- Step 3: Press yourself upwards until you fully extend the elbows, and repeat.
- Take a look at our Dip Exercise Guide and learn more about the muscle building benefits of the parallel, ring, and bench dip.
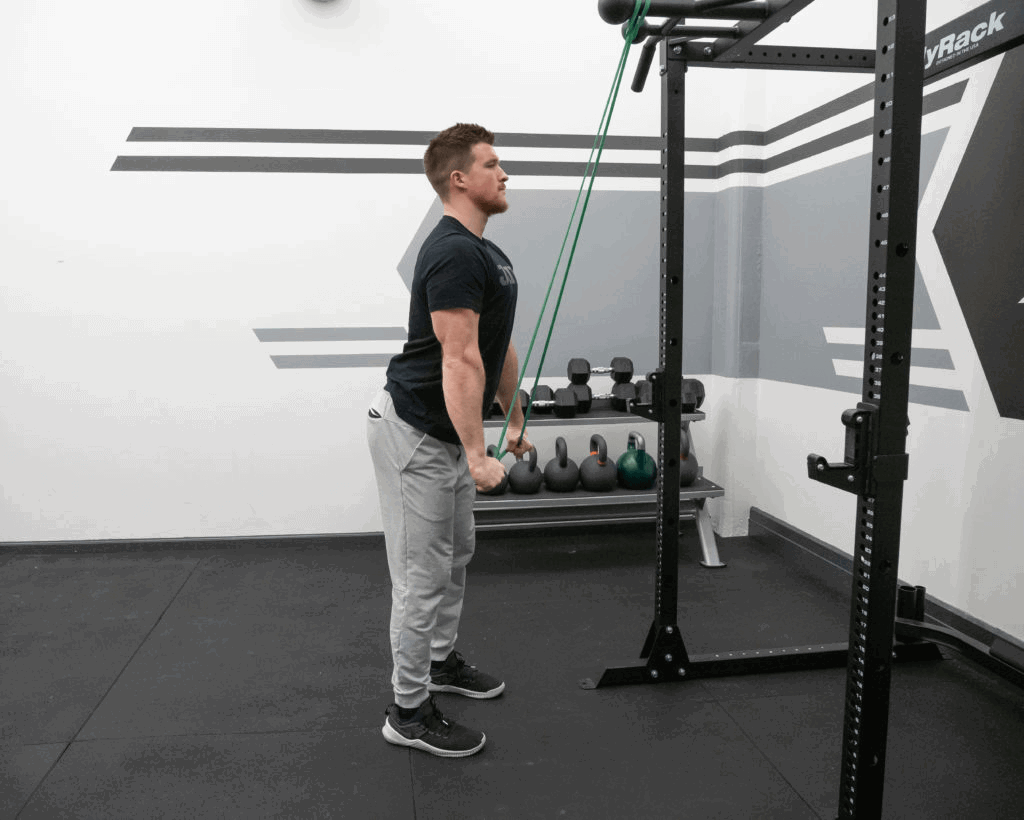
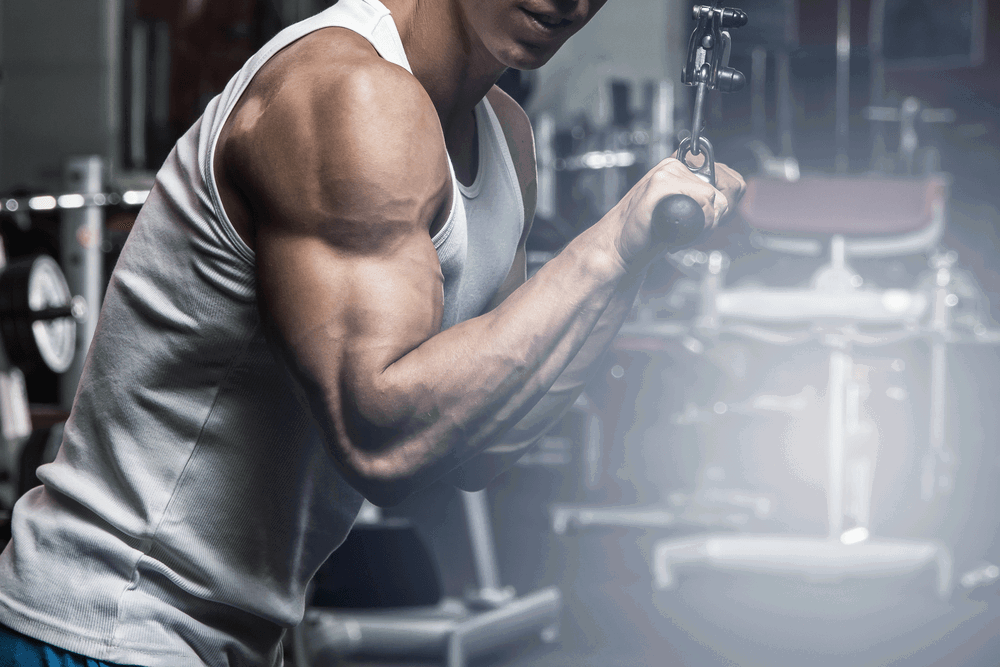
3. Triceps Pushdown
The triceps pushdown is an effective single-joint exercise for targeting the triceps. This single-joint movement allows lifters to isolate the muscles while minimizing shoulder involvement and additional joint stress.
3 Benefits of the Triceps Pushdown
Below are three benefits of the triceps pushdown that coaches and athletes can expect to gain when adding this isolation movement into your triceps training.
1. Isolate the Triceps
The pushdown, done with either a cable system or resistance bands, is a great movement for isolating the triceps. By fixing the lifter in the correct setup, you minimize shoulder involvement, making elbow extension (concentric) and flexion (eccentric) the joint actions that occur.
2. Maximal Muscle Contractions
High amounts of muscle activation can occur during movements like the pushdown as the muscle is kept under constant tension. Movements like the pushdown can also be done to increase the mind-muscle connection between the lifter and their voluntary muscle contraction.
3. Improve Triceps Hypertrophy
The increased time under tension, enhance muscle contractions, and overall isolation of the triceps pushdown helps to promote hypertrophy. Additionally, the ability to train this muscle in higher volumes without being limited by the fatigue of other muscles (chest, shoulders, etc) allows for an isolated approach to tricep development.
How to Perform the Triceps Pushdown
Below is a brief guide on how to perform the triceps pushdown with cables and/or resistance bands.
- Step 1: Set the cables or band at a high anchor point.
- Step 2: With your body facing the band, place your feet together and elbows to your sides (by your ribs). The chest should be up and the back flat, with a slight 10-15 degree bend at the hip (angled forwards).
- Step 3: Grab the handles or band while maintaining the position in step 2. With the wrists at about chin level, fully extend the elbows to push the handles/band downwards, making sure to keep the elbows slightly in front of the shoulders (from the side view).
- Take a look at our Triceps Pushdown Guide, and learn how to master this single-joint triceps exercise!
4. Skullcrushers
The skull crusher is a triceps exercise that can develop the long head of the triceps brachii. This exercise can be done with a bar, cable system, and other free weights.
3 Benefits of the Skullcrusher
Below are three benefits of the skullcrusher that coaches and athletes can expect to gain when adding this lying triceps exercise into strength and hypertrophy programs.
1. Versatile Triceps Exercise
The skull crusher is a versatile triceps exercise that can be done with a wide variety of equipment. Lifters who have access to specialty bars, dumbbells, kettlebells, and cable systems can all reap the benefits of this lying overhead triceps extension variation.
2. Improved Lockout Strength
Elbow extension is the primary joint action involved in the skullcrusher, making it a good exercise to isolate triceps lockout strength. Additionally, this movement often allows for higher amounts of loading to be used, which can improve its application to other strength-based pressing movements.
3. Stronger Triceps
Promote stronger triceps by using the skullcrusher, which can be done using higher external loads and volume.
How to Perform the Skullcrusher
Below is a brief guide on how to perform the skullcrusher.
- Step 1: Start by lying supine on a bench, with the hands supporting a weight (bar, dumbbells, cable attachments) at the top of the bench pressing position. The back and hips should be set up identical to a bench press.
- Step 2: Pull the elbows back slightly so that they are pointing behind you (rather than directly vertical) as you bend the elbow joint, lowering the bar handle or loads towards your head.
- Step 3: The bar should nearly make contact with the forehead/cranium, hence the name skullcrushers. When done correctly, you should feel the stretch on the triceps and some of the serratus/lats. Once you have done so, push the bar upwards.
- Take a look at our Skullcrusher Exercise Guide and learn more about this triceps strength and mass exercise.
5. Seated Machine Dip
The seated machine dip, unlike the parallel dip, ring dip, and even assisted dip machine, allows a lifter to take body control out of the equation. In doing so, the lifter foregoes some benefits of core stability and muscle coordination for the overall ability to load the triceps with high amounts of external loading and stress; a recipe for muscle hypertrophy and strength.
3 Benefits of the Seated Machine Dip
Below are three benefits of the seated machine dip that lifters and coaches can expect when integrating this machine-based triceps movement into training programs.
1. Good for Beginners
The seated machine dip allows beginner lifters to build foundational upper body and triceps strength and mass without the need to support their own bodyweight in space. While that ability is important, many lifters can be limited due to their overall strength and coordination, making the seated machine dip a good isolated approach to acclimating them into more advanced triceps movements.
2. Builds Massive Triceps
The seated machine dip is a movement that allows a lifter to focus 100% on moving loads. With the lifter locked into place, they can promote isolated movement at the shoulder and elbow joints often under high loading and volumes.
3. High Amounts of External Loading
The seated machine press allows lifter to move high amounts of loads relative to other dip movements. While loading in this machine exercise may not be similar to free weight training, the need for body control and core stability is less while using a machine, allowing a lifter to focus all their efforts on one thing; triceps extension and overall muscular output.
How to Perform the Seated Machine Dip
Below is a brief guide on how to perform the seated machine dip.
- Step 1: Assume a seated position with the chest up and back flat.
- Step 2: Grab the handles so that the elbows are at a 90 degree bend, or slightly more flexed at the bottom of the dip. It is important to not allow the shoulders to move forward at this bottom position.
- Step 3: With The body rigid and upper back stable, forcefully press the handles downwards, extending the triceps. Repeat in a controlled yet forceful manner for the prescribed repetitions.
6. Standing Bodyweight Skullcrushers
The standing bodyweight skullcrusher is a bodyweight exercise that can develop triceps strength, lockout performance, and core stability.
3 Benefits of the Standing Bodyweight Skullcrusher
Below are three benefits of the standing bodyweight skullcrusher that lifters and coaches can expect when integrating this bodyweight movement into training programs.
1. No Equipment Needed
The bodyweight skullcrusher can be done using a barbell in a rack, suspension straps/rings, and/or anything stable enough to support one’s body weight. The lifter can vary their angle to increase difficulty on the triceps, making this a great bodyweight exercise to add to bodyweight training programs, vacation training, beginners programs, and in gyms with limited tools and space.
2. Integrated Core Stability
The lifter must remain in a plank position. In doing so, they can improve core stability and enhance bodily control and coordination necessary for other movements like dips, push ups, and more advanced bodyweight training variations.
3. Builds Triceps Strength and Mass
Like the lying skullcrusher, the bodyweight skullcrusher can allow a lifter to train with high amounts of volume. Additionally, the ability to extend sets by altering the body placement within sets makes this a great movement for performing drop sets and other advanced hypertrophy building methods (by simply extending the set past fatigue by changing body position).
How to Perform the Standing Bodyweight Skullcrusher
Below is a brief guide on how to perform the standing bodyweight skullcrusher.
- Step 1: Start with the hands on a barbell that is set at hip height.
- Step 2: With an overhand grip at shoulder width, allow the elbows to bend as you let your torso fall forwards towards the bar, feeling the stretch on the triceps.
- Step 3: The elbows should remain pulled close the sides of the head. To increase difficulty, step the feet backwards and open the hip. To decrease difficulty, step the feet forwards and allow for more hip flexion. This will increase/decrease the amount of your bodyweight being supported by your upper body.
- Step 4: Once your head is under the bar and your elbows are fully flexed, extend your elbows, pushing your body back into the original position. Repeat.
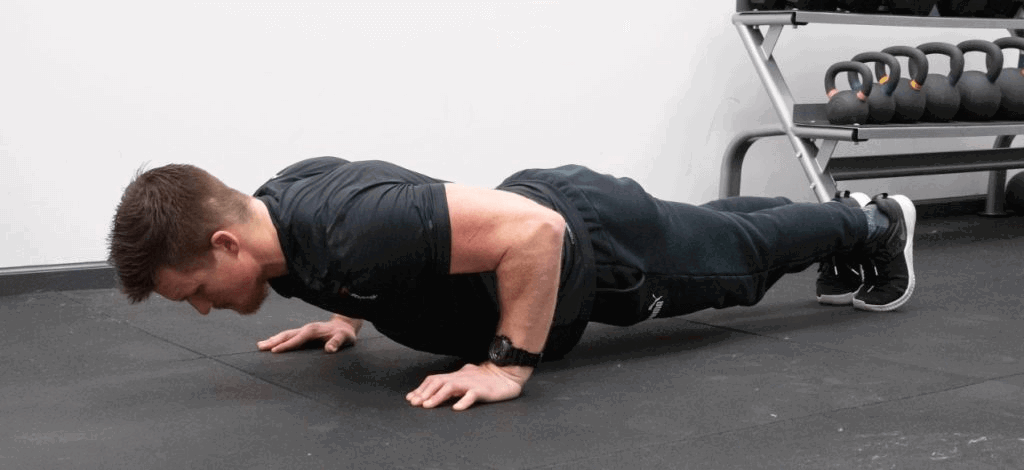
7. Close Grip Push Up
The close grip push up is a push up variation that places a greater emphasis on the triceps. This results in improved triceps strength, muscle hypertrophy, and lockout performance.
3 Benefits of the Close Grip Push Up
Below are three benefits of the close grip push up that lifters and coaches can expect when integrating this push up variation into training programs.
1. Requires No Equipment
The close grip push up requires no equipment and little space, making it ideal for any setting.
2. Great for Beginners
The close grip push up can be used with beginners to develop pushing strength and triceps hypertrophy. The ability to vary the difficulty by dropping to the knees or pressing from an elevated position can increase the application with a variety of ability levels in beginner lifters/athletes.
3. Integrates Core Stability
The close grip push up, like the push up and other bodyweight exercises, requires a lifter to exhibit core stability to properly perform the movement.

1.Assume a Plank Position
To perform the push-up, start at the top of the plank position with the back flat. The arms should be fully extended with the hands directly underneath the shoulder joint. The feet and thighs should be pressed actively together.
Often, beginners will place their hands too far forwards in front of them. Be sure to place the hands under the shoulder joint, maybe even slightly back towards your hips.
Coach’s Tip: Assume a plank with the torso rigid and back flat. The head should remain in a neutral position.

2.Set Your Back
While in the plank position, actively pull your shoulder blades together to create tension in the upper back. This will help stabilize the shoulder girdle and ensure proper stability in the lowering phase of the push-up.
Set the back by pulling the shoulder blades towards the hips and extending the upper back. Be sure to not let the hips sag or lower back hyperextend while in this position.

3.Pull Yourself to the Floor
Once you are set, think about pulling your elbows to the back, similar to a row position. This will help activate the upper back muscles and provide you with stability as you approach the bottom of the push-up.
Do not let you head or shoulders slouch forwards towards the floor. Rather, think about pulling your sternum in between your hands.
Coach’s Tip: The thighs, hips, and chest should all make contact on the floor at the same time. If these are out of order or do not occur at the same time, this may suggest sagging of the hips and/or hyperextension in the lower back.

4.Reach Into the Floor
Once you have touched the floor, press yourself away and upwards by trying to reach your hands into the floor. By thinking about reaching, rather than pushing, you can reframe the movement to have the body find stability and strength from the upper back.
Push yourself away from the floor, and focus on keeping tension in the upper back.
Coach’s Tip: Stay rigid in the torso and be sure to not let the hips sag in the upwards movement of the push-up.
- Take a look at our Push Up Exercise Guide to learn how to master the perfect push up!
8. Floor Press
The floor press is a compound pressing movement that increases strength and mass of the triceps. Additionally, it has direct application to movements like the bench press, making it a great accessory exercise for powerlifting and strength athletes.
3 Benefits of the Floor Press
Below are three benefits of the floor press that lifters and coaches can expect when integrating this compound pressing movement into strength programs.
1. Stronger Bench Press
The floor press is a direct derivative of the bench press and can be used to increase triceps and lockout strength in lifters who struggle in the final phases of the bench press.
2. Triceps Strength
The floor press can be done with high amounts of load and in higher volumes, making it a great exercise for developing strength and hypertrophy.
3. Decreased Shoulder Stress
The floor press can decrease the amount of stress placed upon the shoulder joint, as the range of motion limits the amount of horizontal shoulder extension that occurs. This limited range of motion in the press results in higher utilizations of the triceps. This is a good variation for beginners or lifters cleared to return to pressing after injury.

1.Setup Underneath the Barbell
Start by positioning yourself on the floor underneath the barbell (eyes should be underneath). With the legs either straight or bent, be sure to place the feet, hips, and upper back on the floor, similar to that of a bench press.
Note, that this relationship with the floor is essential to the floor press. Often, individuals who struggle with this on a bench may find it easier to develop greater back tension in the floor press in the early learning phases.

2.Grip the Floor, Bring Elbows Downwards
With the body actively gripping the floor, firmly squeeze the barbell and pull the elbows down towards the torso, on a slight angle to ensure that the back muscles and posterior shoulders are being activated.
Be sure to pull the barbell to the base of the chest (just above the sternum) so that the elbows are roughly 45 degrees from the torso.

3.Gently Contact the Floor, Then Press
Once you have gently made contact with the back of the elbows to the floor, remain in tension and reverse the movement so that you go into the concentric pressing phase of the floor press.
Note, that lifters can pause at the bottom of the press (which I prefer) to help increase stability, control, and gain a deeper understanding on how to develop and maintain tension and strength throughout the full lift.

4.Lock Out, Prep for Next Rep
Once you have returned to the top of the movement, repeat for the prescribed repetitions, rest, and repeat.
Make sure to not over protract at the top when completing a rep, as this could throw your positioning and base out of line.
- Take a look at our Floor Press Exercise Guide and learn how to build serious triceps strength with this bench press variation.
9. Decline Bench Lying Cable Extension/Skullcrusher
Similar to the skullcrusher, this lying triceps exercise is done on a decline bench, which increases the range of motion of the movement.
3 Benefits of the Decline Bench Lying Cable Extension/Skullcrusher
Below are three benefits of the decline bench lying cable extension that lifters and coaches can expect when integrating this triceps exercise into training programs.
1. Increased Range of Motion
Increasing ranges of motion can help to increase muscular hypertrophy and strength. While partial movements can be helpful for addressing certain sticking points in training, maximizing muscle strain and stress using the fullest ranges of motion can often increase muscle engagement and growth.
2. Maximized Muscle Contractions
The increased range of motion allows for a more maximal stretch on the triceps. In doing so, you force a lifter to fully utilize the triceps muscle throughout a deeper range of motion. This can help to promote greater muscular contractions and stress.
3. Decrease Shoulder Involvement
The setup of this exercise forces a lifter to take the shoulder out of the movement, making it a great way to isolate the triceps without placing strain or stress on the shoulder joint. This is a highly isolated approach to training the triceps, and can be done so using less loading than a standard triceps skullcrusher.
How to Perform the Decline Bench Lying Cable Extension/Skullcrusher
Below is a brief guide on how to perform the decline bench lying triceps extension.
- Step 1: Start by lying on a decline bench, with your head towards the cable attachment/resistance band.
- Step 2: Set your body up similarly to the lying skullcrusher, with the elbows placed further back due to the decline.
- Step 3: Perform a skull crusher in the full range of motion, and repeat